Results 1 to 4 of 4

Thread: Alan Wake PC Walkthrough, Tips and Cheats

  1. #1
    Join Date
    May 2008
    Posts
    432

    Alan Wake PC Walkthrough, Tips and Cheats

    Alan Wake is now available on PC. Below is a guide which will define the game play episode wise. I had not used many images in the game. The reason that there is nothing much to look for. I had tried to provide to the point solution which can help you to end up level as early as you can. The game is divided in 6 parts. The game plot is based on fictions place called Bright Falls in Washington where Alan and his wife Alice are on vacation. Under some circumstances she disappears and Alan went back to the place to find her. In the search he encounters darkness which is the main enemy of the game. Enemies with mixed with supernatural and mortal powers make Alan’s job more horrific. He has to deal with everyone to get to the end. The way to stop Darkness is by using Light. So the flash torch in the game is the primary weapons. If you want to learn about the game plot in details then you simply refer to Alan Wake PC Review. This review has a link for Alan Wake All PC Issues and Fixes / Troubleshooting Guide. You can refer to this short guide for basic troubleshooting in the game. Simply click on the Alan Wake All PC Issues and Fixes / Troubleshooting Guide and follow the question below. The review has quiet well explanation on the game plot, combat skill and enemies. Second thing the gameplay is not so tough. But really interesting to play. The central character in the game Alan Wake does no possess any super power, but with his basic human skills he tries to solve the most mysterious query of the world.

    Alan Wake in search to stop the Darkness. He found himself to be trapped in a terror where humans infected with darkness attacks him and blocks his way. In the game Alan has to find and locate objects which will help him to achieve his task more properly.

    Alan Wake PC Walkthrough

    Episode 1

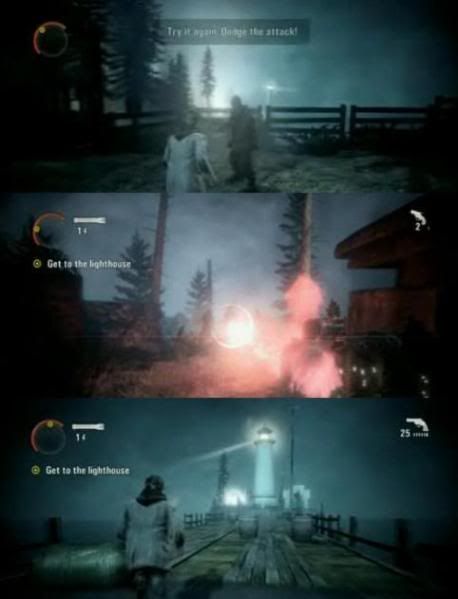
    The game beings with searching of a Thermos. A tea/coffee holder which is the primary object in the first part of game. This is not an object but a kind of secret which Alan will keep on discovering as the level passes. You can check your collectible section to figure what items you will have to search. The game comes with custom difficulty mode. Every mode has a different kind of gameplay. Like in Normal mode it is much easier to collect objects while under Nightmare things are complicated. As you finish the game based on custom difficulty more things are unlocked. The first part is a kind of training part where you will see a dark shadowy creature with axe charging on you. Learn to dodge and try to stay as far as you can. The training session will teach you to use flashlight and a revolver. It is important that first you aim the flashlight on the enemy so that its darkness is reduced and then shoot with revolver. Reload as fast you can. You can then search in the bunker for more ammo and flare gun. There are safe zone in the game which are under streetlights. Here Alan can reveal his health and then start playing back again. It is recommended to use the ammo wisely. It will help you to deal with larger number of enemies. Alan has to reach towards the lighthouse. Try to reach the lighthouse as fast as you can and you will the receive a gun and a flash torch. Use it and clear your way out. Look at the crate before going on the right site. There you will find the first collectible. Run towards the light house via broken bridge. You will encounter a number of more enemies in between. At a checkpoint you can collect some guns and flares. Reach under the street lamp. You can throw the flares to enemies killing a multiple of them with single hit. Move ahead and reach the lighthouse. Next to that there is a Diner.


    This is the part where the game beings. Inside the Diner you will to find Carl Stucky. Keep moving and you will reach a lobby with darkness. You can see a mark on the screen which will tell you to choose the door. This is your first checkpoint. At the Diner you can talk to the local people. You will receive a key. Now you have to move ahead. Now your job is to leave the Diner. Go upstairs and you can see Alice with a typewriter. Now here you will need to restore the power. For that you will need to locate the generator in the backyard. Turn the same on and then go and fine Alice. A new cut-scene will begin. There will be some cutscene again in this part. Once the cut scene ended the game will being changing. Alan will has to reach the gas station fast. This time you will move through the woods and finally reach towards the lumber yard where you will find Carl Stukey. Collect a flashlight and revolver and then move fast as Carl will run bulldozer on the house. You have to get soon out of the open door. Carl is being possessed by the darkness. This time you will start dealing with the enemies. Kill some of them and do not forget to collect ammo as you keep moving.

    As the power goes more enemies appears. You can try the flashlight on them and shoot them. Try to reach near any light area so that you can recharge yourself. This time there is really a very long way to go. You must avoid any enemy to surround you. A quick escape can be life saver. To cross the river you can take the help of logs. Make your way from the fallen trees and cross the river. More enemies are waiting for you so do not just rush into them. Later on to pass you can use a log to make a bridge out of it. Inside the lumber yard there will more couple enemies. You will have to find the generator here which is on the left part. Activate and use the logs to make your way. Once you start running into woods or move ahead the number of enemies will be frequent and increasing. Try to move towards the gas station safely. To end up the last battle you will need to use a Flash gun and Shotgun. To reach the gas station you have to collect some items before. There is a house near to right side where you can find some collectibles. The final boss of this episode Carl will appear and you have to take him down slowly. The best way to avoid major defects to stay away from the enemies. There is plenty of time here you can use it to clear them out. To end up a multiple enemies use the flare gun. Carl will be a bit faster then others. To get the right shot wait for sometime. You will have to learn the movement of this character before shooting it. Now enter the gas station once you are done with Carl. This will start the next Episode of the game. Get the phone.

  2. #2
    Join Date
    May 2008
    Posts
    432

    Re: Alan Wake PC Walkthrough, Tips and Cheats

    Episode 2

    In the beginning first thing you have to do is to find a fuse box. There will be no light here but by moving the mouse you can locate an indication on the screen. This part of the game starts with a flash back where there are some objectives which Alan has to do. The power might go back and to get the light you will have to find the fuse again. Find the fuse and reach Alice where a new cut-scene starts. Start the coffee maker which will trigger one more cutscene where Alan is in a police station. Here his objective is to find Sarah first. Keep collecting items in between. There will be readymade indication on your screen about the location of collectible. Alex will need to first collect an ID card from a junk car. This id belongs to Alice. Go in the parking lot and find the car. Now the scene continuous at the visitor center. Here you will need to find Rusty first and just gave a form on the desktop. You will get keys of a cabin. When you reach the cabin you will find another character and you journey will start here. Look for some collectibles in the cabin. As the night comes the darkness will revealed more enemies on you. So you do not forget to get filled up with ammo and weapons needed to deal with the enemies. That will be lot tougher to locate in the night. You can find some supplies in the next cabin. The center will be destroyed soon. Talk to Rusty and just try to move in the area to find more collectibles. There will be lights.

    Which will help you to get healed fast. Kill some enemies and move on. Now Rusty will be possessed by the darkness and Alan will have to kill him to move ahead. This is one of the tougher enemies you will encounter. You will just need to move away from him and shoot as you can find a chance. Keep using the flash light on the darkness to make him weaker and weaker. When Rusty is died more enemies will appear. Do not forget to bring them down also. You will find a shotgun here. Now the map will tell you to move towards a Lovers peak. Keep moving towards it. There will be some enemy on the exit of cave. You can collect some batteries from the telephone booth. Remember that you will get attacked by enemies in between. So be alert. Get some ammo leave the enemies and run towards light. Follow the mark on map. In the way Alan will have to kill more enemies. There are checkpoints in the game which are under a street lamp. So if you are killed you can being back from it. If you can expertise yourself in saving yourself from attack you can safe your life more. There are street lamps in the way which will go on shutting one by one. Keep moving as fast you can. When you reach a safe house you can heal yourself. If you are playing the same level in nightmare mode then it tougher to reach a safe house. There are enemies which will block your way. So you have to dodge and stay a bit away.

    Alan will find a trolley will be helping him to reach to another area. There is button which will activate the trolley to reach on the other side of peak. One you pass this part avoiding all problems a new cutscene will being. Here you can see a kidnapper with a gang of enemies. You will need to follow him. The enemies will attack you. You can take them one by one in the woods. In this part flares and flash light will only help to burn the darkness. Only the kidnapper has a gun. You can use the flares to make our way out. Use the light and try avoiding the enemies. You can throw flares which will make your way behind the kidnapper entering a room. Follow him. Now here you have to deal with him. Use the flash light and flares to bring him down. After a cutscene Alan will be back in the woods. In the woods there are traps on the ground. You can see white lights on the ground do not land on them. Here in the woods you will find the pages. They can be traps. So you have to be careful, do not collect any of them. Here also you will need to kill some enemies and activate the generator. Now you might reach to a much darker area where enemies might kill you. You have to keep changing your position so that you are not completely surrounded by them. Kill them and move to safe house. Check the map and this time you will have to find a crash plane in the area. There are ample of ammos in this plane. Enter the cabin and move to the next cabin. Kill a couple of enemies. The darkness is spread around the area. You can move the up area to reach the top and there you can found some boxes. Try to walk slowly and see that you do not land up on the dark matter.

    Once are up there is a small area where another boss is waiting for you behind the boxes. Maintain a proper distance and bring him down with your flash light. Shoot him as you can and explore the area. The enemies in the part are stronger. You can get more supplies from this area. You will also encounter an enemy with chainsaw. There are no major changes in the game strategy. You just need to maintain distance and burn them out with your flash light. Back in the cabin you will find a key. This key will help you to use a truck in the garage. Move towards the building and then drive the garage. Move the hills. The flash light will protect you while moving towards the hill on foot.

    Episode 3

    You will lead to Rose. Follow him. Rose gives you a nightcap, and her a day awakens later. When you leave the trailer park you come across the police, the need to escape it. It runs as fast as you can through the ditch and keeps you away from their searchlights. Are you going to find anyway, then tried to escape on the run. In the higher you have to wait for the essential pattern of tracer teams, or you'll be shot down. Necessary coverage for addiction and stones in the jungle and waits for a suitable opportunity. After you pass the ranger tower, she reached a gate full of dark energy. You need it with the searchlight Push Open, the left takes you up the hill from you. However, the generator broke and works only a few seconds. Align the headlights. Can you manage it is not, and then goes back to the generator and "fix" him with a kick.

    The next time you find right next door haunted a torch with which she can destroy the. Then collects all the flashbangs before a police car overturned. With which you can destroy multiple enemies at once shadows. A little further, just before the small wooden bridge, a resting place with a radio. There you can find grenades replenishment. Also in the trunk of the nearest police car. The radio station is not far off - hurry up, because the supply of stun grenades will not be enough. Instead, as soon as possible trying to reach the light of the resting place in front of the radio station. There, you can take anything. After you have been scared away from the radio station, you'll find another manuscript, and flares, which urgently needs it to you to buy time to turn a generator. In the resulting light find her a new gun with ammunition.

    You will reach a hut with Flash light. Activated and then it goes straight into the hut. Get ready for a serious assault in which you should use the newly found flashbang quiet. Left next door is a shed with ammunition and the last doses pyramid, should dispel her absolutely. Run to the overpass and climb up the ladder. Invisible force is attacking you, which you can destroy with a strong beam of your flashlight. 20 destroyed by the way invisible force waving an achievement. However, you should prefer to run and avoid, if possible, the many are condemned. Not an easy place, so you'll either need luck or more attempts. Should you still have a light torch in stock, so she lights now. It keeps the invisible force at least for a while at a distance and also consumed in its life force. On the platform for the radio antenna is a high-power flashlight (B hold for the long exchange). In the following discussions of the lying around you should make use gas cylinders. They are explosive on ignition and also quite bright, the gnawing at the energy of your opponent and you save ammunition that you can already use a few meters away much better. Increases beyond the fence in the car. Grab the car and drive on towards the road mine. The way you'll pass three buildings, which should shine through because of their radios and the manuscript page.

    After the cutscene you have about the quality of the station. At the point you should turn off the power to get past the electrified fence, make sure you stun grenades and ready to blow up enemy contact and the countless explosive gas tanks by fire. Especially the way from the switch back to the fence is not easy. Proceeds slowly, so that you do not engage with all enemies at once. Before you continue working until it comes out of the mine. Take necessarily with stun grenades, which are the pick behind the goal. If she uses it cleverly, you can save a lot of ammunition. Can about the place where you replace the shotgun against the shotgun, the road forks. Right you come on, there is left only a thermos and ammunition in a shed. Cross the ghost town and take in the old mill with the keys in the shed. With whom you come into the main building where you can swap the shotgun for a hunting rifle. Follow the path until you are at a gallery in silver mine. After the collapse of the primary shaft have to dodge her into a side tunnel. Now uses switch on the crane to you to build a bridge on every level to the next platform. After leaving the mine reached by cable car and its suspension bridge, a mountain ruin, it crosses over the basement. Behind it reaches its peak and the end of Mirror Episode 3.

  3. #3
    Join Date
    May 2008
    Posts
    432

    Re: Alan Wake PC Walkthrough, Tips and Cheats

    Episode 4

    Follow Dr. Hartman and returns after the introduction back into your room. After the start of the turmoil in the lodge of the slain nurse, you take the key out. Barry Freed, and then tried to escape from the hospital. These have to get rid of it until the Invisible force is behind. Throw the generator to the first floor to enable the work light. Now it gets tricky. To escape from the hospital, you have room after the eighth with a TV-obsessed to the steel ball. She charges at you, destroying you door. Run past her and lures her to the exit door, so she also shatters this. In the maze you can not lose you, really, but you should be careful that their ammunition and batteries lying around do not miss, because there are a few very hairy controversies. Take, therefore, next door to the resting place necessarily in the shed with the shotgun. The skirmish at last gate, looking at the Barry after the key is just an endurance test. The opponents grow here until Barry finds the key, so go careful with your ammo. Head up to the farm of rock grandpas. Do not move unarmed and without a flashlight. You will find standing around Flash light and. Once you have activated the generator, you need the light to turn owned gate, so it dissolves. Behind her is also finally a flashlight. Without a weapon you have but little chance of survival. Hurry as fast as possible to the next generator that powers a quiet city with energy. Now you have to light cone to light cone run, without running from the enemies. Soon you will meet at a rest stop, but the bears no weapon, but at least ammo and a better flashlight (hold B button for the exchange). After the scene with the light on her vision should watch your feet. There are bear traps around again. With the shotgun you get will also make a weapon. Since ammo is scarce, however, you need to take to calm cities outside the house with the blue car defend only in an emergency. Instead, run like hell.

    Grab the car and drive to the farm. In defending the farm on the stage you should immediately grab the shotgun, the stun grenades and high-performance torch. Then it goes on the direction of "Valhalla", House of Anderson. To do this you must go through the barn. In the barn of the farm you come into it until it climbs up the ladder around the corner and the machine, which blocks the gate, high per switch. Uses the switch on the top floor of the barn to use the Viking ship against the door. Work your way through the silo up to the top floor of the generator to fire up, and then ride the elevator down. Go to the shed where the individual comes from the shadow and killer climbs up the ladder and onto the roof. How you get to the silo door. The key to the door, waiting in front of Barry, is in the shed next door. Turns in the Anderson House the power back and find the related record. The following is a dream passage and the end of Episode 4.

    Episode 5

    Once you come out of the cell, it can collect two manuscript pages. In the space left behind the cell block, you will also find flares that you will still need. Collected in the office of the sheriff your basic equipment to replace it (flashlight, revolvers, shotguns, ammunition). On the cell block, it goes out again. Go to the yard, slips through the hole in the fence, let down the fire escape on the right wall and climb up. Accumulated on the roof in any case, the flares on before you move on the water tower. Jump onto the lift and ride down the road. Sheriff Sarah leads you out of the police station. Left at the counter you can open the door to the police station - but you should first destroy the black puddle with a torch. Sarah now follows along the street. From the T-junction, you should keep your eyes open, because here are all around ammunition units and Collectibles. Very important: Go into the diner and take better there with the flashlight. Moreover, because ammo, and you'll find - if you walk along the corridor to the loo, and a manuscript page. Sarah follows, for they will lead you to the office of mayor. What you should comb through her thoroughly, then you not only finds the key for the helicopter, but also a manuscript, a hunting rifle, a high-power flashlight and plenty of ammunition. . The key is in the room with the high performance lamp on the desk fits but once you take the keys and leave the room, the story goes on automatically. Collect everything in advance so you want to have one. Then it goes through the bookstore. At the T-junction were many useful items hidden.

    About the church she gets into a basement where it is quite dark. The thermos is in the left corner is easily overlooked. Run to the helicopter landing pad, forget not to look directly at the light before pickup. There are massive stun grenades and other munitions, which you can use the same very well. As soon as the ground attack is over, it simply increases in the helicopter and flies away. After a fall from a helicopter you need a new revolver. You can find a little in the shed. Covers you in with ammunition. Power cables are dangerous - even for your enemies. Shoot all the little plate that holds the chain, from the garage door, and enter into the substation. This will supply you with tons of supplies: batteries, ammunition, shotgun, etc. Grab anything you, plug in what you can. In addition, you can climb up the wooden pallets and right on the fence over. You come into the open again and reached an area with many current coils, transformers and dangerous power cables. The cables should not touch her because they cause you much damage. However, they are just as dangerous for your opponent. You can save a lot of ammo if you shoot the black people against the cable.

    Workers across the blue lift onto a roof you can get and leave the boundaries. You will reach a road and a bridge control center, where you can rotate the bridge with a switch you can. Cross the bridge (and takes care that it comes out on the right side ). Protected by the helicopter searchlight you can pass relatively little. Run after him and then lingers in the light cone, if you are attacked. Stay in the glow of the helicopter, and then you may be healed faster. Covers you in a generator room of the power plant with ammunition and leave him again. You must now disconnect the substation via emergency stop coming, but not come close to this inflation. Turns lock gates open at that close all three locks, so you can translate to an emergency switch. Go back now to the generator room. Because of the crash of your friends you run cross country, despite more convenient solution to the dam. You'll find Barry and Sarah shortly after the crash site and moved further from the dam.

    After the freight elevator you'll find a switch that opens the door to the dam. However, you have to hold him because he is defective. This allows your friends to escape, but you do not. Go with Alan instead left on the coils and piles up the mountain. Once you're reached the top of the dam, you should adjust the floodlights so that it illuminates as many opponents. At the dam you need sometimes start to overcome gaps. Then flees before the vortex of the perineum (the truck down the left through the underpass) and runs as fast as you can into a small building, where it is via a spiral staircase to a lower part of the dam. Here it is damn wobbly and you must jump start to bridge some gaps. After that, it is also closely: You can only just before the vortex in the next freight elevator, so it does not make you comfortable and take the legs to the hand!

    Episode 6:

    Take in the flashback, the glasses from the nightstand and the painkiller from the bath. In the rest of the apartment's nothing there, so listen for it on the answering machine. Turns the TV using a remote control. Get off at this point, run down the slope and cover you with one ammunition. Now grab the car and drive down the road to Cauldron Lake. Once you see a left-hand excavators and tree trunks, you should stop off and run down the slope. At the bottom is a hidden chest on the way it is but a gun with ammunition. Do not miss this opportunity. Especially on the higher difficulty levels you are dependent on each ball. Could it through the road tunnel on foot, and there is a change to darkness. Take on the manuscript page the car is ready, and drive on. After the point where you can drive the possessed of the pile, finds her left hand a motel. Loot it to increase ammunition, then we walk over the bridge and deal with the invisible enemy.

    Drive slowly and take you owned the barrels, tires, etc. before individually, then it comes through well. When you are allowed excavator never stand still! Deviates from his shovel again, and exposed him to the lamp. A torch light also helps. Behind it you can get into a car again. After a while you come to a roadblock stop by a dilapidated garage, which ought to scour their ammunition. Behind the shop also has a box hidden. Ride up the hill on the ramps to the junkyard. There, you have to then continue on foot past the stove with ammunition and manuscript, then high up the ladder in order to raise the generator. Now uses the switch that has been energized so that the crane gives the obstacle out of the way. Increases again in the car and drive on. At the house on the hill at the top followed by the yellow arrows through their mining town (let you fall through the hole) and push away the lore. Go through the village and examined the wooden huts, there are some dust it off again.

    Although you've already scoured the mine, you'll find on the way back, new ammunition and forgotten Collectibles. Climb in and releases the brake. After the wooden bridge you have to fire up again a generator. Grab necessarily because the ammunition lying around. Now you need only to "covered car" to follow. In the next timber settlement must jump down her on the first hut to the first floor and the balcony railings loose. Turns now big generator and activates the elevator. Continue booting. Destroy the block with your flashlight - it's not long until the last encounter with the dark tornado. Gather up the pistols, ammunition, just before the Tornado, is as close as possible and shoot the flares in the center of the tornado. Destroy the written words with your lamp, and they are subject to these. After the cutscene you have to find the clicker. Because it only comes out through the kitchen. In addition, you have the written word "clicker" overcome with a flashlight, or is not ran it. Redeemed the cursed items (words in the landscape) with the light and enter your cottage for the end of the game.

  4. #4
    Join Date
    May 2008
    Posts
    432

    Re: Alan Wake PC Walkthrough, Tips and Cheats

    Alan Wake PC Tips and Tricks

    1. Scans everything. Every cabinet, every door, every emergency kit, just everything. If not, you will soon find a shortage of ammunition and also miss a lot of Collectibles.
    2. Resting places. Especially with large volumes opponents you can usually find a brightly lit resting place near where you can not harm enemies. Here you can refuel their energy and is often a useful item nearby.
    3. Should you have it in for the achievements of Collectibles (canned pyramids, thermos flasks, TV shows, etc), then plays the first chapter once and normally goes through and then through the chapter selection once again. When first run, you know not what you expected and where it can be dangerous. While still looking after all the
    4. Collectibles, you would destroy the some them for fun, because you and you will take out of the story. Believe me, after I post the solution I know whereof I speak. Read all the memos and see all the TV / radio broadcasts, so you can put together the story well. If not, you lose the thread from Episode 3.

    Alan Wake Strategy for Dealing with Enemies

    In Alan Wake, there are not very many types of enemies. In some places I avoid encounters with opponents. So that you can move ahead without loosing much health.
    1. Shadow Monster: They use axe, chainsaw freak, etc. are actually quite harmless. Their strongest attacks are always preceded by a bullet-time slow motion (press RB), which gives you the opportunity to take evasive action. These and other monsters until Super place to stay are vulnerable when they stand in the light. Sure, they can also be without their light pumped full of lead, but you are wasting an awful lot of ammunition here, because they are in the dark, almost immune. Always uses your flashlight when firing, or the amplified beam of light. If you out of the juice, then see first how far the enemy is still far from you. Is it far enough, then let the torch for a while to charge automatically, so you can save your batteries. The most effective fight their shadow people, if they are directly in front of you. The smaller the distance, the better effect of light and balls. Even a shot in the torso or head is obviously more effective than any other hit.
    2. Birds: From the shadows you get owned small birds without a weapon. It takes is a light beam. Importantly, in birds do not remain in one position. That makes you easy prey. In extreme many birds had fallen on the use of flares or flares.
    3. Invisible Force: This are the hardest to combat. Their can be unpredictable development of various objects is accomplished in seconds, which gives you just react to space. You can destroy them with the strong beam of your flashlight or any other kind of light. Uses including exploding barrels, if any, for such a ball of fire is rather bright flare guns and flares also are useful. In some places the Invisible force are so numerous and so fast that her feet better (temporarily) take in hand. It is generally not the best solution, in Alan Wake to run away, but just when it needs some Invisible force.
    4. Weapons: Do not be fooled, the shotgun is not as strong as it looks. She will only be helpful in the melee. The revolver because it is more accurate. Pistols and stun grenades are the best friends on the other hand, if you want multiple enemies at once to the laundry. Flashbangs are strongest and destroy all shadow beings within several meters away. To push the effective radius of the best, you should be as close as possible with your grenade when it goes up. Do not worry, you can not harm the grenade, but opponents usually fall directly on you, so that the light radius also works most effectively in your area.
    5. Safe House: Uses illuminated resting places for recreation. Here you can not threaten opponents. With flares you can not hurt most opponents. Especially when they shadow people tend to push back quickly. This is good for you to miss a break to recharge. Of course, they are also more vulnerable due to the strong light, but they can really hurt you not alone with the torch. Invisible force is the exception. Especially for large objects, such as a Bulldozer, you should necessarily a strong light source to fall back to drive the strong poltergeist. Here flares are really incredibly useful.
    6. The Collectibles: Some collectible objects were hidden pretty nasty. It is relatively difficult to find all at once, so you would rather let time and tried it in several attempts over the chapter selection. Collectibles are listed here chronologically listed, i.e. in the order in which they are to be found in the game.

    List and Location of Collectibles in Episode 3:
    TV shows:
    • In the room where her coffee wakes up to Roses.
    • On the top floor of the train depot building
    • In closed buildings (the mill) behind the ghost town

    Radio broadcasts:
    • Links of Roses Trailer is another caravan with a radio on de stairs
    • At the resting place where there are the dazzling grenade replenishment. (To the right of way)
    • The building to the destroyed bridge on the road to the mine
    • The Ranger Tower

    Doses pyramids: The mini-shed next to the wooden building with Flash light

    Manuscript pages:
    • Directly in front of Roses caravan when you exit.
    • On the run from the police on the way...
    • Directly from stress on the right hand after the police car crashed in front of you.
    • On the stone after the first wooden bridge
    • On the precipice right hand to the railing loose wooden bridge
    • On the fence after the radio station.
    • After the generator (shortly after the radio station), a steep long way up the right. Top of a transmission tower is a manuscript page
    • Right of the hut with the Structurally Tern at a closed gate
    • On the way to the hut with the Structurally Tern (right at the roadside)
    • After the resting place along the path opposite to the direction of a tree stump
    • Just before the railway overpass
    • Before the ladder to the platform antennas
    • On the balcony of the train depot building

    Manuscript sites in Mirror Peak:
    • In the red building on the way to the mine
    • At the entrance of the mine
    • On the ground after the trap door of the mine
    • On a pile of wood in the room with the red chair (near the ladder)
    • Outside the mine on a stone by the wayside.
    • On the bridge in the ghost town
    • In the right slot of the silver mine, just before the clearing.
    • In the great silver mining area with the chains on the ceiling
    • After the silver mine left high and up the stairs of the ladder in the shed.
    • Cross the bridge on the way to the left of the collapsed bridge.
    • On the steps towards Cauldron Lake

    Thermos flasks
    • On the table in front of the destroyed boat when you go to Rose.
    • In the kitchen of Rose.
    • The Ranger's Tower (a sort of observation deck)
    • In front of the car at the radio station
    • After Generator behind the radio station the road forks. Go right up the steep path. At one of the serpentine curves (on edge) is a thermos flask.
    • In a small hut shortly after the shed.
    • On a pallet next to the red boxcar at the train depot.
    • After the encounter with the bulldozer on the road right

    Thermos flasks in Mirror Peak:
    • Before you ride by on the destroyed bridge that rises from left to gorge. Along the gorge walk and look for a red chair. On it she is pot.
    • Before the mining museum in the far corner.
    • On the ground floor of the mine before the trap door
    • Oh, on the red chair climbing the ladder.
    • At the end of the plank of wood next to the resting place outside the mine (next to the tunnel with the box)
    • After the shotgun get the road forks. Links it goes to a shed with a fluted
    • In a building on the right side of the bridge in the ghost town
    • After the locomotive Poltergeist behind the cottage with the keys.
    • After the collapse of the mine shaft syllable in the room with the chains, follow the path and split tunneling can take the left...
    • Well after the long suspension bridge left on the brink
    • After the collapse of the mountain ruins left around the building before the garden gate.

    Hidden boxes:
    • Batteries, 3 x flares: Just before the radio station, an arrow points to a stone into a cave to the right.
    • Batteries & 3 flares: The tree stumps with the manuscript to the given direction of travel and raid the shed.
    • Hidden in crates Mirror Peak
    • 4 x flashbangs: after the pickup truck outside the mine is divided the way (there is a small wooden door with a symbol). Just run straight uphill into a tunnel.
    • Ammunition and gun supplies: go after the two leaders left behind the mill along the gorge.
    • 3 x light gun ammunition: enter the bridge and left a trail.

    List and Location of Collectibles in Episode 4:

    TV shows:
    • Automatically at the clinic
    • On the run from the clinic in the room with the manuscript page.
    • In the farm house, upstairs, to the room with the drunks.
    • In the barn

    Radio broadcasts:
    • In the office after receiving the key.
    • The Ranger tower after the fork to the farm.
    • In the penultimate floor of the silo.

    Manuscript pages:
    • You get automatically from the Rock n Roll Grandpa
    • After returning to Alan's room on the stairs.
    • In the room with the tape on the back table.
    • Do you get automatically in Hart's office?
    • On the run from the clinic in the room with the TV.
    • On a tree in the maze
    • In the back of a dead-end of the maze
    • In the shed with a shotgun beside the resting place.
    • After the leaf obsessed with the wheelbarrow (before pond)
    • After the rest of the towns in the opposite direction of the target point.
    • Manuscript pages before and at the Anderson Farm:
    • At the end of the mine tunnel.
    • The generator
    • On the way, if the light speaks to you
    • At the tower with the generator
    • At the entrance to the farm
    • The Anderson House on the first floor.
    • In the back left corner of the farm land.
    • Down in the barn
    • In the upper floor of the barn.

    Thermos:
    • In the room with Hartman's other patients on the counter
    • In the same room as before, only the upper floor on the railing
    • Where you Barry freed by the window sill.
    • Across from the gate at the Barry to escape from the hospital is on the wall.
    • In the Pavilion
    • The resting place for the stone pillar next to the pond Shotgun
    • Thermos flasks before and on the farm:
    • On the small wooden house in the middle of all flying objects.
    • At the rest stop.
    • At the tower up.
    • In the kitchen of the house with the blue car.
    • If you have a car, looking at the rusty vintage cars on the road after the first corner.
    • In the stands on the farm.
    • Directly in front of Barry's nose
    • At the back of the barn
    • The car of the Andersons.
    • On the third floor of the silo.
    • In the toilet of the Anderson House.
    • In the kitchen, the Andersons.

    Hidden boxes:
    • Pistol, ammunition: After the maze at the pond at the stone pillars, arrows indicate the way to the wall box. Hiding boxes in front and on the farm:
    • Stun grenades, 3 x flares: In the basement of the house with the blue car (i.e. not immediately go away with the car when you see it, just turn around and into the basement)
    • 2 x stun grenades: Behind the fork to the farm in the house to the left of the road.
    • Stun grenades, revolver ammunition: In the house behind the construction site with the shovel.

Similar Threads

  1. Resistance 3 PS3 Walkthrough, Tips and Cheats
    By fumble in forum Guides & Tutorials
    Replies: 4
    Last Post: 30-09-2011, 05:50 PM
  2. Xenoblade Chronicles Wii Walkthrough, Tips and Cheats
    By fumble in forum Guides & Tutorials
    Replies: 5
    Last Post: 18-09-2011, 08:02 PM
  3. Divinity II Ego Draconis Walkthrough, Tips and Cheats
    By Paul in forum Guides & Tutorials
    Replies: 7
    Last Post: 24-03-2010, 12:32 PM
  4. Madden 09 Cheats, tips, Walkthrough
    By Ethex in forum Video Games
    Replies: 3
    Last Post: 11-08-2009, 05:53 PM
  5. Brain age 2 cheats, walkthrough, tips
    By RjS in forum Video Games
    Replies: 3
    Last Post: 03-08-2009, 10:09 PM

Tags for this Thread

Bookmarks

Posting Permissions

  • You may not post new threads
  • You may not post replies
  • You may not post attachments
  • You may not edit your posts
  •  
Page generated in 1,713,583,520.84634 seconds with 17 queries